Shadow Copies can be a lifesaver – when used correctly. They are not a replacement for backups, but can sometimes stop you reaching for that backup tape stored in the depths of the IT office (yes, in that cupboard!).
I recently had a user who managed to delete an entire folder from a shared area – by accident, of course(!) – they owned up to this quickly and we were able to restore the folder back with minimal data loss in a very short space of time. Had we had to restore from backup, this would’ve taken some time – resulting in productivity loss (you know how it is!).
In this case, it was lucky the user came forward and let us know that the folder needed restoring. If they hadn’t, we would have needed to dive around in audit logs, or use a product like Netwrix Auditor for File Servers to work out what was going on.
Enabling Shadow Copies on a Server
This is great, but how do you set it up? I would recommend enabling Shadow Copies on pretty much any File Server volume, unless you have a good reason not to – very high expected disk IO, high turnover of files, temporary storage area etc.
To start with, let’s create a virtual disk to play around on. On Windows Server, open Disk Management (WIN+X, Disk Management) and press Action -> Create VHD.
Hit browse and save the disk somewhere easily accessible. Here, I’ve put it on the ‘M’ drive and given it a size of 1GB just to play with.

If you’re using Server 2012 R2 (and you should be), select the VHDX option. It is far more efficient and uses the characteristics of the underlying drive hardware to enhance performance.
Finally, select either Fixed or Dynamically expanding (basically thick or thin provisioning). VHDX has less of a performance hit when using Dynamically expanding, but still something to take into account if your storage infrastructure isn’t up to much.
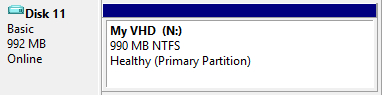
Go ahead and initialise the disk and create a partition the maximum size formatted as NTFS, with a drive letter. When you’re finished it should look something like this:
Right click the volume and choose properties, then the ‘Shadow Copies’ tab. Click on your drive letter and press ‘Settings’.
Either choose an appropriate limit, or select ‘no limit’ for the maximum size, then press ‘Schedule’.
Shadow Copy takes a snapshot of all files/folders on the volume at given points in time. It uses a copy-on-write method, so a snapshot won’t use any extra space until files are changed from how they are in the snapshot. The default for this is 7am and 12pm (mid-day).
Here in lies a problem: Shadow Copy has a fairly significant limitation – there can only be 64 ‘snapshots’ per volume. Do you choose more frequent snapshots, at the expense of being able to restore back? Or, do you choose to have less frequent snapshots? Here’s a handy table:
| Snapshot Timeframe | Maximum Retention |
| 1 hour | 2 days 14 hours |
| 2 hours | 5 days 7 hours |
| 6 hours | 2 weeks 2 days |
| 12 hours | 4 weeks 4 days |
| 1 day | ~ 2 months |
| 2 days | ~ 4 months 1 week |
| 7 days | ~ 1 year 3 months (448 days) |
There are several ways in which to setup Shadow Copies, and you can choose whichever suits the type of data you’re protecting the best. I normally give shared areas a shorter retention time, more frequent snapshots than single-user areas, simply because the margin for error is that much greater.
Don’t forget that this schedule will compliment your backup one!
When you’ve created your schedule, press OK all the way out.
Restoring from a Shadow Copy
Let’s have a look at restoring from a Shadow Copy.
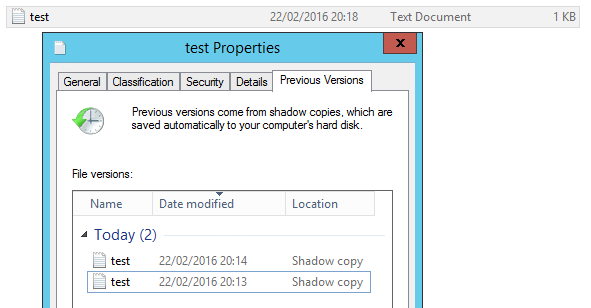
Here, I’ve created a text file on my VHD and taken 2 snapshots at different stages. To access the shadow copies, right click the file and choose ‘Previous Versions’. The available shadow copies are populated:
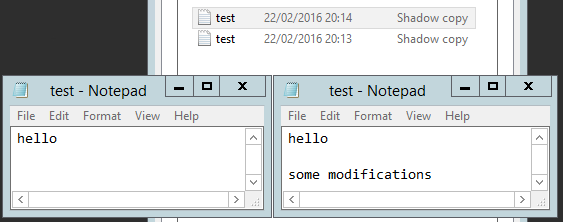
To open a version of the file, simply double click its name in the previous versions tab…
To replace the copy that is currently visible on disk, simply click the version you’d like to restore and press ‘Restore’. It is important to note that this will remove any shadow copies newer than the version you are restoring! As a general rule, I copy the file and then overwrite the version on disk.
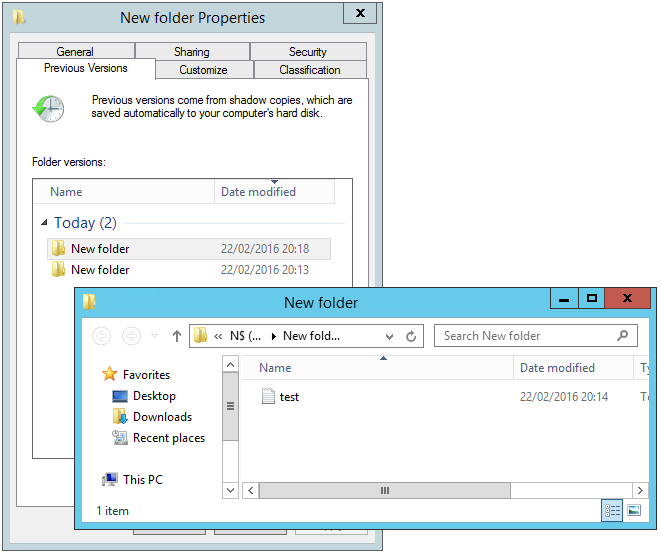
But what happens if someone deletes a file or folder? Not a problem – just navigate up a level and choose previous versions on the parent folder. You’ll get a folder (or drive) view that you can pick and choose files to restore:
Enabling Shadow Copies on a Desktop
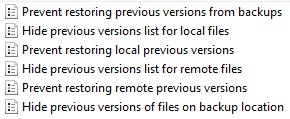
When browsing a network share that has been shadow copy-enabled, by default any user can look at the previous versions tab. There is a group policy option to disable this, should you wish to: Computer/User Configuration -> Policies -> Administrative Templates -> Windows Components -> File Explorer -> Previous Versions. Here are the available options:
Microsoft has, for whatever reason, disabled the configuration of Shadow Copies on Windows Desktops for a while now. The functionality however is still alive and very much kicking! Shadow Copies are taken when taking System Restore points (see my post on how to re-enable System Restore in Windows 10 here), or when installing Windows Updates (OS Drive only).
You can however, make your own whenever you feel like it.. Open PowerShell as an Administrator and type this in:
(Get-WMIObject Win32_ShadowCopy -list).Create(“C:\”, “ClientAccessible”).ShadowID | Add-Content “C:\shadowlog.txt”
Obviously you can replace C:\ with another NTFS drive letter if you wish. This will create a Shadow Copy for the C Drive, and write its ID to c:\shadowlog.txt. You can then delete the shadow copies using this file again later if you wish to.
To browse this Shadow Copy, type \\localhost\c$ (or another drive letter if you did that), right click -> previous versions.
Again, the 64-copy limit remains, so if you decide to put that command in scheduled tasks, don’t schedule it too often! I’ve found that twice per day is usually good enough.
Just to tidy up, if you want to remove all the ShadowCopies created using this script:
get-content “C:\shadowlog.txt” | foreach-object { $shadow = $_; (Get-WMIObject Win32_ShadowCopy | where { $_.ID -eq $shadow }).Delete() }; remove-item “C:\shadowlog.txt”
That’ll read each line in turn from C:\shadowlog.txt (which contains a list of IDs), deletes the shadow copy from disk and finally deletes the shadowlog file.
(Incidentally whilst writing this article, I managed to delete the WMI Win32_ShadowCopy object – should this happen to you if you’re messing around, here’s how to restore it: mofcomp c:\windows\system32\wbem\vss.mof)
Leave a Reply to hdic Cancel reply